Thinking back to the era of Windows 3.0, 3.1, and Windows for Workgroups, I dimly recall that printer drivers could be especially troublesome. Happily, with Windows 95 through Windows 7, printer problems didn’t register much on my radar. But in the wake of upgrading my network to Windows 10 a few years back, I noticed an uptick in printer problems. On the other hand, Windows 11 seems rock solid where printing comes into the picture.
If printing is a cause for concern with your Windows setup, you may be relieved to know that all problems I’ve encountered have been easy to diagnose and fix, providing you know what steps to take to figure out what’s up. I hope this how-to will help readers zip through detection and diagnosis and proceed more quickly to the usual cures for printing ills.
Typical symptoms for printer problems
Without belaboring the obvious, the most common issue with printing in Windows is an inability to print to some specific print device. Somewhat frustratingly, you might select a known and formerly working printer, fire off a print request, and see nothing happen in response, other than the number of jobs in the print queue increasing. What gives?
Other typical symptoms include the following:
- Adding a printer to a PC or the network, only to find no corresponding device entry popping up in the Settings app (under Devices > Printers & scanners in Windows 10 or Bluetooth & devices > Printers & scanners in Windows 11) or in Control Panel (in the Devices and Printers pane in Windows 10 or the Printers & Scanners pane in Windows 11).
- Upon encountering the conditions described in the preceding item, one may further encounter difficulties finding a device driver for a missing or uncooperative printer.
- A printer may be visible as a device in the appropriate place in Control Panel or Settings, but it may show a status of “Unavailable” or “Offline.” Sometimes, all attempts to change this status through printer controls in Windows or on the device itself fail.
Diagnosing and fixing printer problems
For the vast majority of printer problems, a device driver is somehow involved. It may be corrupted, broken, or missing. That’s why the most common fix for printer problems is fairly simple and straightforward — namely, removing the problem device and thereby uninstalling its driver, then adding it back again. For all but a few of the cases I’ve encountered in over 200 upgrades to Windows 10 and 11 (and further research on reported problems with printing or printers), this has been sufficient to fix the problem that is best described as “can’t print” or “won’t print” to a print device.
I’ll walk you through this technique in detail in a moment, but using Windows’ built-in printer troubleshooting tool may provide a shortcut to getting your printer working again, so it’s worth trying that first. Herewith, then, is my two-step approach to diagnosing and fixing printer problems:
Step 1: Run the Windows printer troubleshooter
In both Windows 10 and 11, the printer troubleshooter is found in Settings. Click Start > Settings, then type trouble into the search box. In Windows 10, select Additional troubleshooters from the Troubleshoot pane. In Windows 11, that option is named Other troubleshooters. From either vantage point, Printer is the option to select.
This launches a standalone troubleshooting utility that performs various tests on its own, then enacts automatic fixes if it can and reports on activity (or lack thereof) upon completion. It’s easy and straightforward to use. This resolves the vast majority of print issues on its own.
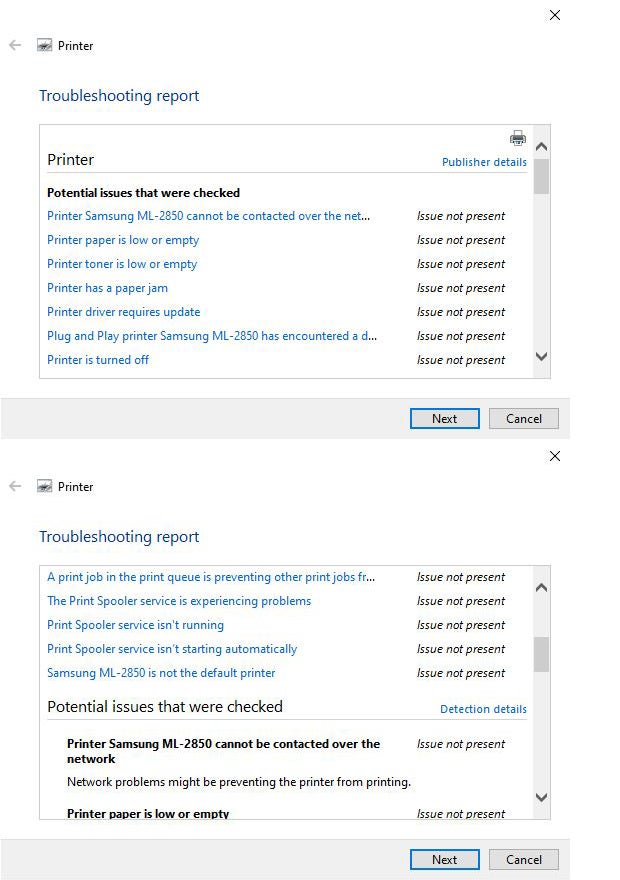
Figure 1 shows the issues that the Windows 10 troubleshooter checks. (They don’t all fit into a single window.)
 Ed Tittel / IDG
Figure 1: The Windows 10 troubleshooter checks for 12 issues in all — seven appear in in the top screen, five more in the bottom screen.
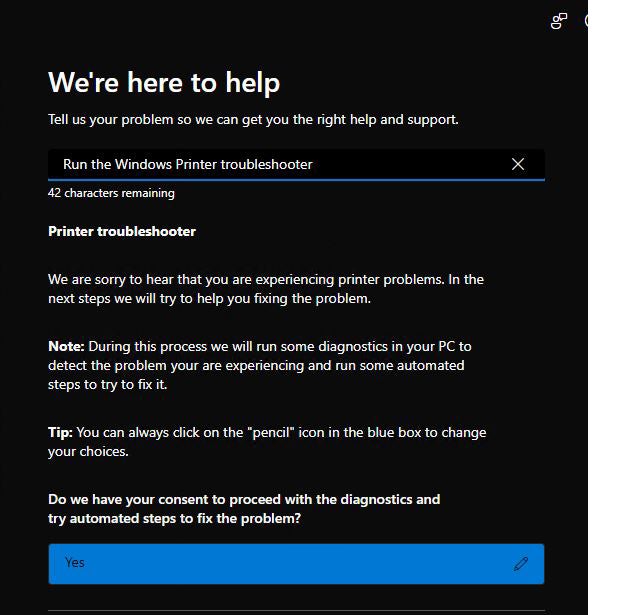
Windows 11’s printer troubleshooter is chattier and offers up more info, as shown in Figures 2 through 6. I’ll provide commentary in each caption to explain what’s showing. You can scroll up or down among the screens shown in Figures 3 through 6 as you like.
 Ed Tittel / IDG
Figure 2: The initial printer troubleshooter screen in Windows 11 gets you started on the troubleshooting process. When you click Yes, it produces the info shown in Figures 3 to 6 as a single scrollable window.
 Ed Tittel / IDG
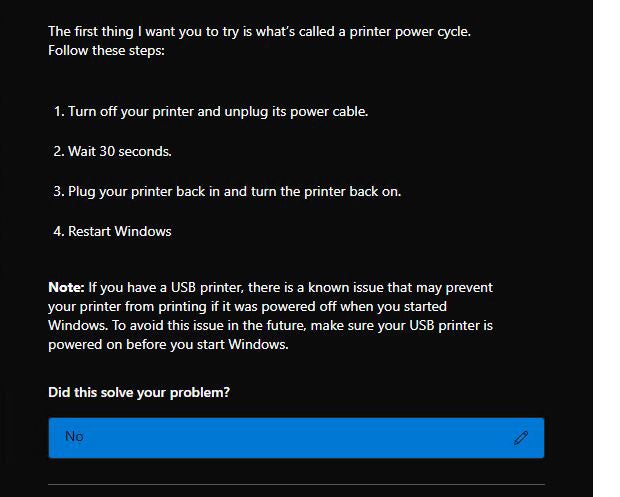
Figure 3: The troubleshooter suggests a manual user action — namely, to power off and unplug the device, then plug it back in and power back on. (Note the special instructions for USB-attached printers.)
 Ed Tittel / IDG
Figure 4: A printer may not show up in the devices list. (If that’s the case, it reads “My printer is not listed.”) The troubleshooter begins the first four issue checks.
 Ed Tittel / IDG
Figure 5: Two more issue checks, plus the “Add Printer Wizard” button and follow-up.
 Ed Tittel / IDG
Figure 6: Seven remaining issue checks, followed by the overall “Did this solve the problem?” check. Across Figures 3 to 6 we see the same issues checked as in Figure 1 for Windows 10.
Overall, the Windows 10 and Windows 11 troubleshooters cover most common Windows print problems. If this doesn’t fix what’s ailing your printer, move on to Step 2.
Step 2. Remove and replace the driver for the problem printer
To remove a printer, go to Settings > Devices > Printers & scanners in Windows 10 or Settings > Bluetooth & devices > Printers & scanners in Windows 11. Click the printer’s device entry to go to its properties page, then click the Remove button at the top right. Alternatively, you can right-click the device entry in the Devices & Printers pane (Windows 10) or Printers & Scanners pane (Windows 11) in Control Panel, then select Remove device from the resulting pop-up menu.
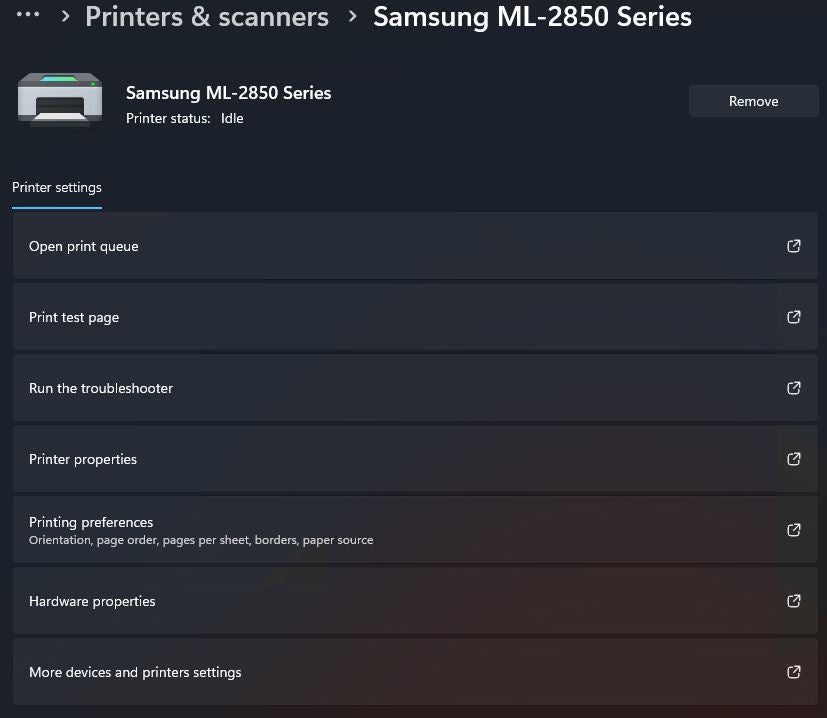
Figure 7 shows the Remove button to the right of the Settings entry for my Samsung ML-2850 network attached printer (in Windows 11).
 Ed Tittel / IDG
Figure 7: The properties page for my Samsung ML-2850 printer in Windows 11. Note the Remove button to the right of the printer display. (Also note access to the troubleshooter for this specific device — another way to handle printer issues.)
Note: If you try to remove a printer from the Printers list but find yourself unable to complete that action, try clearing its print queue. Apparently, Windows likes to have its print queues cleared before permitting a related print device to be removed. (This goes back as far as I can recall and applies to XP, Vista, 7, 8, 10, and 11.)
To do so, right-click the icon for the problem printer in the Devices & Printers or Printers & Scanners pane in Control Panel and select See what’s printing from the resulting pop-up menu — or, if you’ve got the printer’s properties page open in Settings, select Open print queue from the list of options. Then delete all pending items by highlighting them, right-clicking, and selecting Cancel.
Once a printer has been removed, it’s time to add it back in. In Windows 10, go to Settings > Devices > Printers & scanners; in Windows 11, go to Settings > Bluetooth & devices > Printers & scanners. You’ll see an Add device button, as shown in Figure 8 (for Windows 11).
 Ed Tittel / IDG
Figure 8: The Add device button appears at the head of the “Printers & scanners” item in Settings > Bluetooth & devices in Windows 11. (It looks a little different but works the same way in Windows 10.)
Click the Add device button, and Windows searches for connected printers and their drivers. You’ll see a list of devices to choose from, which should include the printer you removed. Click Add device for the printer you’d like to add. As it comes online, it shows “Connecting” status first, then “Installing,” with a progress bar that tracks its progress. Upon completion, the device should show up in the list, or it may produce an error status — most likely a “Driver is unavailable” message.
Note: For USB-attached printers or all-in-one devices, it may sometimes be necessary to unplug the USB cable from the computer after uninstalling the device. Then, reboot the PC and reseat the USB cable to force discovery of the device to invoke Windows’ built-in driver search and supply process.
If Windows doesn’t provide a replacement driver, you’ll have to find one for yourself. The best place to do that is at the printer manufacturer’s website, searching by printer make and model, so be sure to have that information handy. (You also can turn to any of the driver download resources available online, such as the free SoftPedia or Snappy Driver Installer, or for-a-fee tools such as Driver Booster, DriverUpdate, DriverSupport, and so forth.)
For my Dell Color MFP (multi-function printer) for example, I had to visit Dell’s Drivers & Downloads page, then enter the device’s service tag ID (printed on a label affixed to the device) to find relevant drivers. I picked the entry with the most recent date — namely, Dell Open Print Driver (dated October 11, 2017) and downloaded the corresponding zip file. In the process of running the dellopd.msi file that installed the necessary drivers, it also set that printer up as the default Windows printer on the target PC. Most printer driver updates will do the same on Windows 10 or 11 PCs.
More on working with Windows printers
When printers get removed and replaced, their associated device names may change. And when a name change occurs, other users who access such printers, either through a network share, a print server, or some similar means of access, may find the previous printer unavailable (because that old name is no longer tied to a valid device). When you attempt to add a printer and such an attempt fails, click the Details link on the results page: if there’s a problem with the device name, the error message (often numbered 1801) is quite explicit in identifying a name mismatch.
To get around this, you must find the current name for the printer you want to add. Then you can elect the add option that reads “The printer I want isn’t listed” and supply a UNC name for that printer. Use this syntax: \\computer-name\device-name (where computer-name is the name of the computer to which the printer is attached or through which it’s available, and device-name is the name of the printer you wish to access). You can use a network-attached printer’s IP address to access the device as well. The free Advanced IP Scanner tool shows you network device names and associated IP addresses (IPv4 only, though). Thus, it provides the focus for another “Add device” method as well.
When it comes to working with printers in Windows, I usually drill down to the properties page for a print device. You can get to it through Control Panel (right-click the device and select Properties), or under the Printer properties button for a device that appears in the “Printers & scanners” pane in Settings. This level of access is necessary for checking print queues, obtaining device status, printing test pages, and the like.
For more help with Windows printer woes, check out Microsoft Learn and the Windows 10 or Windows 11 forums available online. (Of the latter, the most useful are Windows 10 Forums and Windows 11 Forum and the Microsoft Support Community, particularly the Windows Insider Program category.)
Given that printers do act up from time to time, and that drivers pose occasional problems as well, it behooves savvy Windows users to familiarize themselves with management and monitoring tools that the OS provides. By approaching such problems with care, and an “I can fix this!” attitude, you can diagnose and fix the vast majority of such issues, especially if you’re willing to try the “remove and reinstall” approach that flushes out questionable or damaged drivers and fixes most print-related problems. This is the surest path to printer satisfaction on a Windows 10 or 11 PC.
Looking ahead, Windows printer drivers will change dramatically
In a September 6 Windows Learn item, Microsoft lays out an “end of servicing plan for third-party printer drivers on Windows.” The TL;DR version boils down to something like this: By 2025, Microsoft will require all printers to use “Mopria compliant printer devices” for both network and USB-attached printers.
This means everybody will use the Microsoft IPP Class Driver for all printers, to remove “the need for print device manufacturers to provide their own installers, drivers, utilities, and so on.” This will make life easier for those who own printers that fall under these guidelines. The Windows printer troubleshooter should be able to handle any and all issues that might pop up for such devices — at least, in theory.
Starting in 2025, no new printer drivers will be published to Windows Update. In 2026, printer driver ranking order (which determines which drivers to try first, second, and so forth) will change to favor Windows IPP inbox class drivers. Starting in 2027, third-party printer driver updates will be disallowed (except for security fixes).
People and organizations still using older Windows printers will still have to use the tips and techniques I’ve covered in this story. Over time, as these older devices get retired, the troubleshooting routines and tools for Windows printing should become more standardized, streamlined, and simplified. Let’s hope that also means things will work both easily and well. We’ll see...
This article was originally published in December 2015 and updated in September 2023.